Overview: see below for step-by-step w/screenshots
A thumb drive of any size can be used because this procedure installs an "image" of the original operating system onto the stick. Both the installation software and the "image" file must be downloaded before installation.
First download the "image" file G498.zip. This zip file contains a disk image of a drive that’s formatted with the new operating system. After downloading it, right-click it and select "Extract All" from the menu that pops up. It will create folder called g498 in the same folder that contains g498.zip. In the new folder will be a file called g498.img. Be sure to note where your browser downloaded the file because you will need to navigate there from the installation software.
Next, download the imaging software. Double-click it and follow the instructions that come up to install the Win32 Disk Imager program.
Check the box that prompts to create a desktop shortcut.
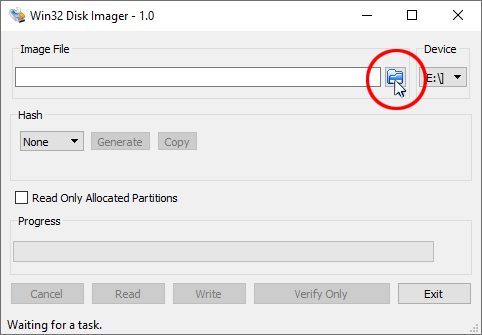
After the disk imaging program is installed, put a thumb drive (at least 2GB: no matter how big it is it will look like a 2GB drive once the image is installed) in your computer. Double-click the Win32 Disk Imager icon. It will open with an empty dialog near the top of its window, labeled “Image File”, with a small folder icon next to it. Click on the folder icon to bring up a File Explorer window. Navigate to the g498.img file and click it, then click Open. Click the Write button and the image will be written to the thumb drive. This takes quite a while. Once it’s completed, close the imaging program.
Next, customize the drive for your machine, if necessary. The thumb drive you just created is suitable for the standard 5HP spindle drive. If your machine is a C-Axis you must delete the runfiles\filepath.cfg file, and copy either filepath.yas (if you have Yaskawa C-Axis drive) or filepath.bml (if you have Baumuller C-Axis drive) as filepath.cfg.
Finally, Update the software. The G498 image is appropriate for creating a bootable thumb drive from scratch, but the image is not kept up to date.
(Better yet, order a replacement thumb drive from the factory.)


If your machine has a standard 5HP spindle drive, your next step is to update the software. The G498 image is appropriate for creating a bootable thumb drive from scratch, but the image is not kept up to date.
Better yet, order a replacement thumb drive from the factory.
If your folder view is set to "Large Icons", it can be difficult to see the files in the RUNFILES folder, so click on the "View" tab, and select "Details".

(Note: if your folder view is set to show all extensions, you will see FILEPATH.CFG).


Note: If your C-Axis drive is a Baumuller, right-click on "FILEPATH.BML".


Note: If your C-Axis is a Baumuller, the filename will be FILEPATH - Copy.BML.

(or FILEPATH - Copy.BML, if Baumuller) as FILEPATH.CFG.

Better yet, order a replacement thumb drive from the factory.