- Download and install the floppy emulator software.
- Download the disk images to Downloads folder.
- Extract the disk images.
- Prepare the new thumb drive.
- Insert the Thumb Drive in Windows PC
- Start the Emulator Program
- Format the Thumb Drive
- Copy the images to the thumb drive. (Optional)
Detailed instructions for Steps 3 - 5 are illustrated below.
Step 3: Extract the Disk Images
- Right-click anywhere on your desktop, then select "New", then click "Folder". Name the folder "Images".
- Navigate to downloaded images.exe, select the file, hold left-button and drag images.exe to "Images" folder.
- Double-click images.exe, then click Extract to extract the files.
1. Create New Folder

1. Right-click on desktop, then select "New", "Folder". Name the folder "Images".
2. Move Disk Images

2. Navigate to downloaded images.exe, select the file, and drag images.exe to "Images" folder.
3. Extract Disk Images

3.Double-click images.exe, then click Extract.
Step 4. Prepare the New Thumb Drive
Insert the thumb drive in Windows PC, then start the emulator program
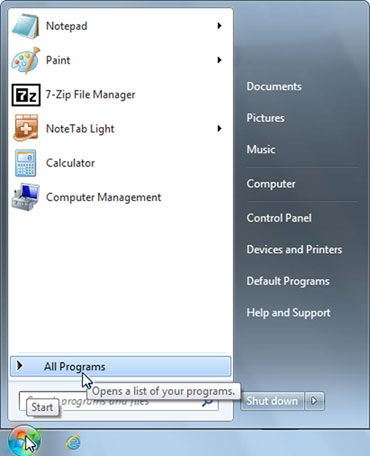
1. Click "Start"

1. Click Start, then click All Programs.
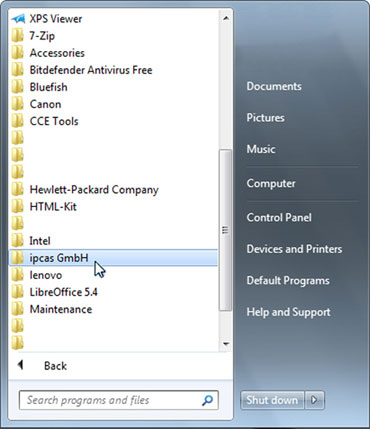
2. Select ipcas GmbH Folder

Click ipcas GmbH.
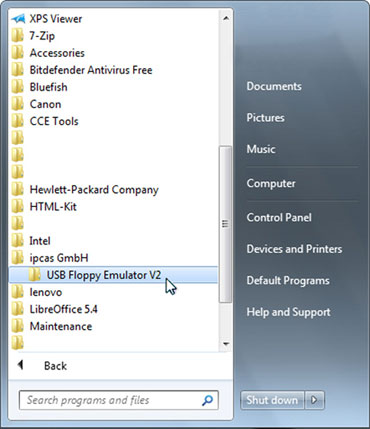
3. Select Emulator Folder

Click USB Floppy Emulator Folder
4. Run Emulator Program

Double click USB Floppy Manager
- Select the USB drive. The left-hand pane will show the USB drives that are connected. If there are more than one, select the one you want to use. The right pane is blank.
- Click “USB Flash Drive” tab at the top of the screen, then click “Format”. A dialog box should pop up.
- Verify that the floppy format is set to 1.44m, the number of floppies is 100, and the "Quick Format" box is checked, then click "Begin to Format".
- A warning dialog should appear; Click OK to start the format.
- After a few moments the “Format complete” message will appear. Click OK.
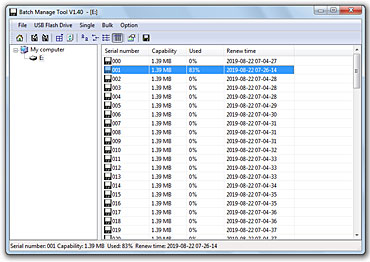
- The right pane is now filled with statistics on the 100 virtual disks just created. This thumb drive is now prepared for program backup. If you want to use it to reformat your hard drive, or update your exec, proceed to Step 5, below.
1. Select the USB drive

1. Select the USB drive.
2. Click USB Flash Drive

2. Click USB Flash Drive, then click Format.
3. Select options; Begin Format

3. Select options shown, then click Begin Format.
4. Click "OK"

4. Click OK to start the format.
5. Format complete

5. When "Format complete" appears, click OK.
6. One hundred floppies

6. Statistics on 100 virtual disks.
Step 5. Write the Images to the Thumb Drive (Optional)
The following steps describe adding software (images) to the thumb drive which will allow you to reformat the OmniTurn hard drive, or update the OmniTurn system on your hard drive.
These steps are not necessary for using the formatted thumb drive for program backup.
To write images, insert a formatted thumb drive in Windows PC, then start the emulator program (see Step 4, above).
- Select disk 001.
- Click the "Single" tab at top of the screen. Click "Write image file"; an explorer pane will pop up.
- Navigate to the images at Desktop\Emulator\images. Select the image file that matches your OmniTurn, then click Open. The table below lists all images and types of machine.
- The dialog box should disappear and the statistics for virtual disk should now show that it’s almost full.
1. Select disk 001

1. Select disk 001.
2. Click the "Single" tab

2. Click the "Single" tab at top of the screen. Click "Write image file"; an explorer pane will pop up.
3. Navigate to the images

3. Navigate to the images at Desktop\Emulator\images. Select the image file that matches your OmniTurn, then click Open. Table below lists all images and types of machine.
4. The dialog box should disappear

4. The dialog box should disappear and the statistics for virtual disk 001 should now show that it’s 83% full.
| Image | Machine |
|---|---|
| 1-5hpgt.img | 5hp inverter drive for GT |
| 2-5hpatt.img | 5hp inverter drive for Attachment |
| 3-baum.img | Baumuller C-Axis |
| 4-indr.img | Indramat C-axis |
| 5-yaskc.img | Yaskawa C-Axis |
| 6-2axhd.img | Oldest 2-axis control |
| 7-genhd.img | hdsu3.3.6 |
| Image | Machine |
|---|---|
| 8-sysatt.img | System disk for inverter attachment |
| 9-sysbum.img | System disk for Baumuller C-Axis |
| 10-sysgt.img | System disk for inverter GT |
| 11-sysindr.img | System disk for Indramat C-Axis |
| 12-sys2ax.img | System disk for pre-1994 "2ax" |
| 13-sysyas.img | System disk for Yaskawa C-Axis |
| 14-vgaupd.img | Update disk for all execs |
- Better yet, order a replacement thumb drive (p/n 995-16-023)
- Software for accessing the different disk partitions on a Windows computer is available online at:
www.omniturn.com/mike/USB_Floppy_Emulator_1.40i.exe
- Hard drive setup disk images are available online at:
www.omniturn.com/mike/images.exe
- Complete instructions (PDF) for using software are available online at:
www.omniturn.com/bin/RepairParts/floppy_emulator_stick.pdf