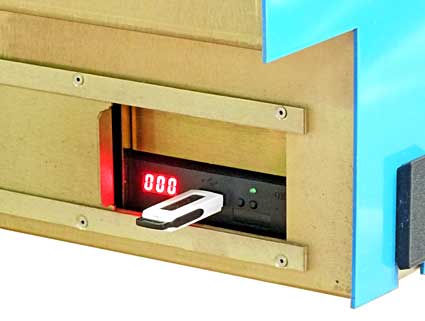
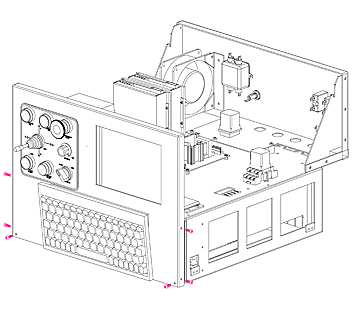
Emulator Installed

- Set power OFF and unplug CNC.
- Remove the blue cover.
- Remove front panel.
- Remove top chassis to expose computer.
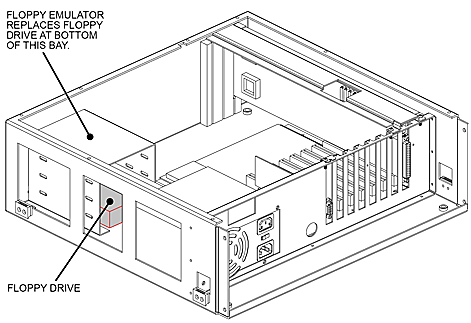
- Replace floppy drive with emulator.
If you NOT are familiar with CNC disassembly, see illustrations.
Below the install illustrations is comprehensive description of the emulator system, and instructions to copy all files from your OmniTurn hard drive to the new thumb drive.
Disassemble CNC to Replace Floppy Drive with USB Floppy Emulator
Remove Cover

Disconnect all cables at rear of CNC. Un-plug power cord, then remove the blue cover.
Remove Front Panel

Remove six screws holding front panel.
Stow Front Panel

It is not necessary to disconnect cables to front-panel. Stow panel in notches at rear of top chassis as shown.
Remove Top Chassis

To gain access to the computer, disconnect all cables at rear of CNC, remove (8) screws and set top chassis aside.
Replace Floppy Drive
 The floppy emulator replaces the existing floppy drive in the drive bay. The emulator mounts and connects the same way as the original floppy disk drive.
Disconnect the power cable and the ribbon cable, then remove and discard the four screws holding the floppy drive.
Install the emulator using screws provided. Reconnect the power cable and the ribbon cable.
The floppy emulator replaces the existing floppy drive in the drive bay. The emulator mounts and connects the same way as the original floppy disk drive.
Disconnect the power cable and the ribbon cable, then remove and discard the four screws holding the floppy drive.
Install the emulator using screws provided. Reconnect the power cable and the ribbon cable.Be sure to orient the ribbon cable with the red stripe toward the power supply connector.
Also, the connectors have two rows of pins; be careful to engage both rows.
NOTE: If you have two floppy drives, the emulator replaces both; plug twisted end of ribbon cable into emulator; disconnect other drive.
USB Floppy Emulator Description
Function
The emulator treats a properly formatted thumb drive as a "stack" of 1.44MB floppy disks, which you can select via the two buttons on the face of the unit. The right button increments the 1's digit of the display, and the left button increments the 10's digit. Pressing both buttons at once increments the 100’s digit. Selecting a different number on the display is exactly the same, from the CNC’s point of view, as removing one disk and inserting another.Thumb Drive
The emulator is shipped with a thumb drive that's already formatted for use. Disk 0 in the virtual stack is blank floppy, ready for use as backup. Disks 1 - 7 are formatted as a hard drive setup disks, which can be used to reformat a failed hard drive. Disks 8 - 13 are system disks, and disk 14 is an update disk for the various execs. A label attached to the stick identifies the different setup disks. The thumb drive that came with your emulator is ready to use. Don't reformat it, because you may need to use one of the hard drive setup disks.| Image | Machine |
|---|---|
| 1-5hpgt.img | 5hp inverter drive for GT |
| 2-5hpatt.img | 5hp inverter drive for Attachment |
| 3-baum.img | Baumuller C-Axis |
| 4-indr.img | Indramat C-axis |
| 5-yaskc.img | Yaskawa C-Axis |
| 6-2axhd.img | Oldest 2-axis control |
| 7-genhd.img | hdsu3.3.6 |
| Image | Machine |
|---|---|
| 8-sysatt.img | System disk for inverter attachment |
| 9-sysbum.img | System disk for Baumuller C-Axis |
| 10-sysgt.img | System disk for inverter GT |
| 11-sysindr.img | System disk for Indramat C-Axis |
| 12-sys2ax.img | System disk for pre-1994 "2ax" |
| 13-sysyas.img | System disk for Yaskawa C-Axis |
| 14-vgaupd.img | Update disk for all execs |
Copy All Files to Thumb Drive
After replacing the floppy drive with emulator, you can copy all your program files from the hard drive to the new thumb drive.
If this is brand new emulator with thumb drive from the factory, the virtual Disk 0 is blank. If it's not blank, copy the programs to an OmniTurn programs backup folder on your desktop computer, then delete them from the thumb drive.
The steps below desribe how to create a "programs" folder on the thumb drive, and how to copy all your programs from the hard drive to the thumb drive
- Turn on the OmniTurn
- At the file backup prompt press Ctrl-C (Press and hold the Ctrl key, then press C). Then press Y to halt the batch job; you should see the C:\OMNITURN> prompt.
- Plug the thumb drive into the emulator.
- Type md a:\programs then press Enter
- Type cd\programs, then press Enter; the prompt should change to C:\PROGRAMS>
- Type attrib +a *. (That's attrib space plus a space star dot), then press Enter. This marks all the program files in the folder as "not backed up".
- Type xcopy *. a:\programs /m (That's xcopy space star dot space a: backslash programs space forward slash m), then press Enter. This will copy all the program files from the PROGRAMS folder on the OmniTurn hard drive to the PROGRAMS folder on the thumb drive, and mark the each program files as "backed up" as it is copied to the thumb drive.
If you have a large number of post-processed cam files, the thumb drive could fill up. If so, just copy the program files to the backup folder on your desktop computer, then delete all the program files on A:\PROGRAMS, then put the thumb drive back in the OmniTurn, and run the xcopy command again. It should pick up where it left off.
Format New Thumb Drive
If you need to format a new thumb drive, it can be formatted in the emulator by depressing both buttons on the emulator's face while powering it up. As the emulator initializes it displays a series of numbers, then, if the buttons are still held down, it begins counting up to 999. Once you see that it is counting up, you can release the buttons. After it reaches 999, it will go back to 0 and stay there. This takes about 10 minutes. Once the stick is formatted you can use it just as if it was a stack of blank floppies. (Much quicker formatting can be achieved using the emulator software below on your Windows computer).Software
To Prepare Thumb Drive for Floppy Emulator.- Software for accessing the different disk partitions on a Windows computer is available online at:
www.omniturn.com/mike/USB_Floppy_Emulator_1.40i.exe
- Hard drive setup disk images are available online at:
www.omniturn.com/mike/images.exe