The thumb drive that shipped with the CNC is bootable, and can be used to re-format the harddrive. If that stick is not available, click here for instructions to create another one.
As of this writing we have used three different motherboards in our G4 controls, each of which has a slightly different procedure for setting the boot sequence. On all of them, the first step is to get into the CMOS memory setting program.
Start with the CNC powered off. Put the new thumb drive in the socket at the back of the control, set power on, then press and hold the Del key immediately on power-up.
The current motherboard (Epia VB7009) CMOS setting program boots into a page with various tabs at the top of the screen. Arrow over to the Boot tab, then down to "Hard Disk Drives", then press Enter. You’ll see the bootable drives listed. If your new USB isn’t the top one on the list, arrow down to highlight it and press the "-" or "+" key to move it up.
The previous motherboard (Epia M830) boots into a menu which lists Standard CMOS Features as the first item and Advanced BIOS Features settings second. Arrow down to highlight the second item, then press Enter to get to the Advanced BIOS Features menu.
Arrow down to Hard Disk Boot Priority, then press Enter to bring up the priority menu. Make your thumb drive the first item (if it isn’t already) by arrowing down to highlight it. Press PgUp (maybe labeled "COOLANT" on your keyboard) to move it up.
If there’s no boot priority selection on the Advanced BIOS Features menu, just arrow down to the First Boot Device and set it to USB-HDD.
On the earliest motherboards (Epia ML) you will boot into a menu which lists Standard CMOS Features as the first item and Advanced BIOS Features settings second. Arrow down to highlight the second item and press Enter to get into the advanced settings menu, then set the First Boot Device to USB.
Once the boot sequence is set correctly, press F10 then Enter to save the change and boot from the USB drive.
If you have set this boot-sequence in order to reformat harddrive, click here for that procedure.
BIOS screens from various motherboards used through the years:
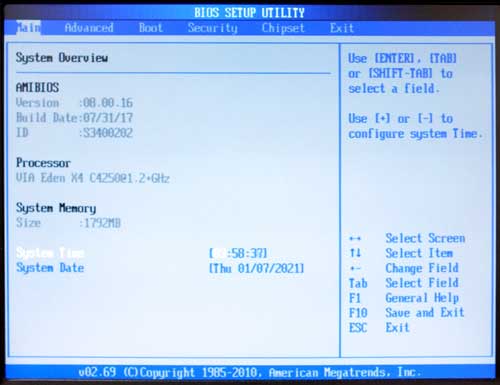
Use right-arrow to highlight "Boot".
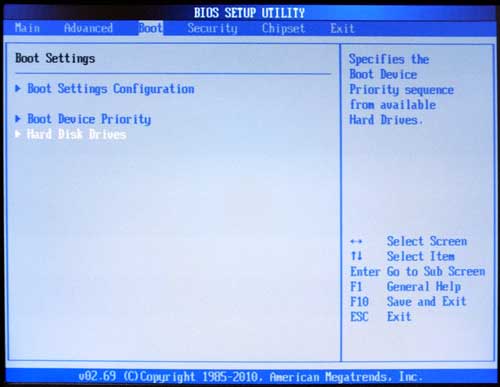
Arrow down to highlight "Hard Disk Drives" then press Enter to bring up the priority menu.
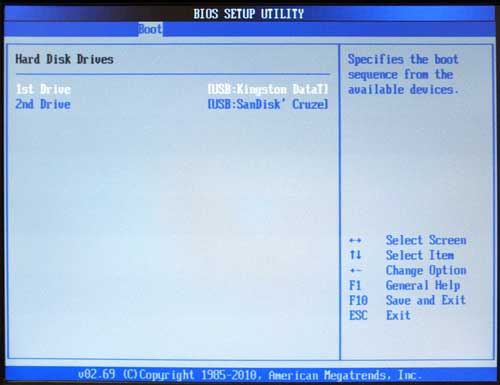
If your new USB isn’t the top one on the list, arrow down to highlight it and press the "-" or "+" key to move it up. Once the boot sequence is set correctly, press F10 then Enter to save the change and boot from the USB drive.
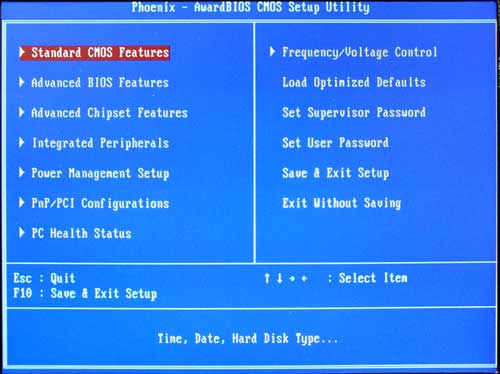
Use down-arrow to highlight "Advanced BIOS Features".
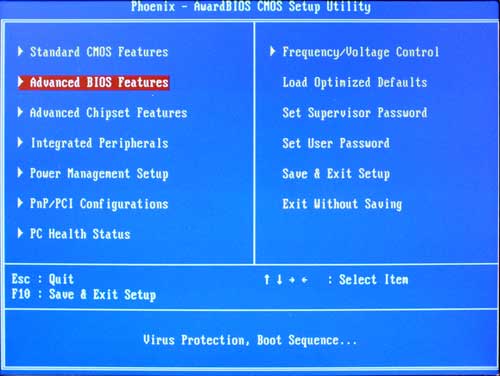
Press Enter to access "Advanced BIOS Features".
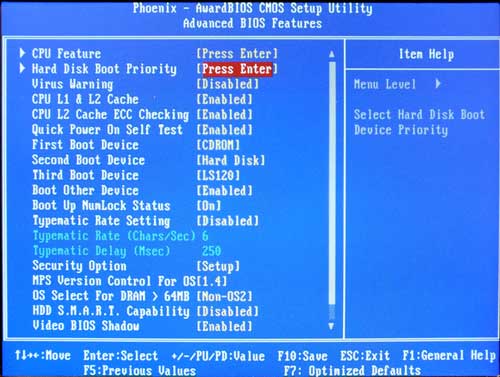
Arrow down to "Hard Disk Boot Priority" then press Enter to bring up the priority menu.
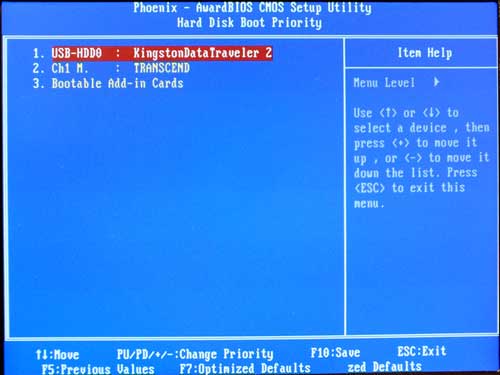
Make your thumb drive the first item (if it isn’t already) by arrowing down to highlight it and press COOLANT to move it up. Once the boot sequence is set correctly, press F10 then Enter to save the change and boot from the USB drive.
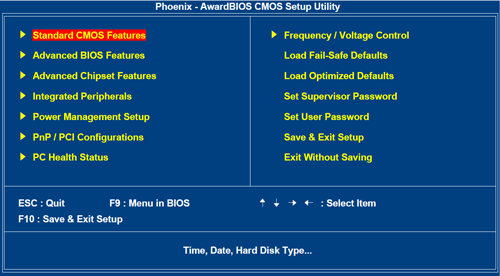
Use down-arrow to highlight "Advanced BIOS Features".
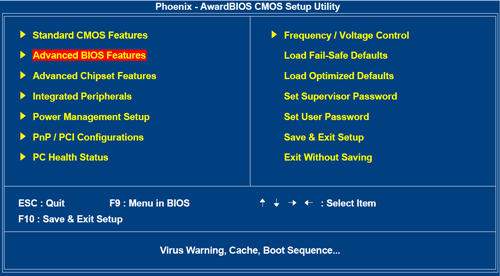
Press Enter to access "Advanced BIOS Features".

Use down-arrow to highlight whatever is opposite "First Boot Device".
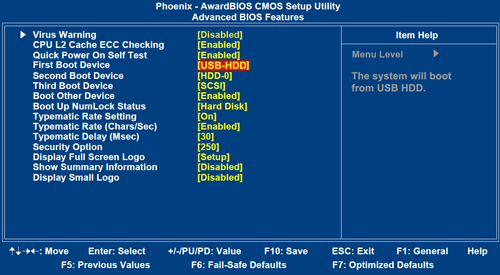
Once the boot sequence is set correctly, press F10 then Enter to save the change and boot from the USB drive.
Current motherboard (VB7009) BIOS Main Screen:
Use right-arrow to highlight "Boot".

Current motherboard (VB7009) Boot Settings Screen:
Arrow down to highlight "Hard Disk Drives" then press Enter to bring up the priority menu.

Current motherboard (VB7009) Hard Disk Drives Screen:
If your new USB isn’t the top one on the list, arrow down to highlight it and press the "-" or "+" key to move it up. Once the boot sequence is set correctly, press F10 then Enter to save the change and boot from the USB drive..

Previous motherboard (Epia M830) BIOS Main Screen:
Use down-arrow to highlight "Advanced BIOS Features".

Previous motherboard (Epia M830) BIOS Main Screen:
Press Enter to access "Advanced BIOS Features".

Previous motherboard (Epia M830) Advanced BIOS Features Screen:
Arrow down to "Hard Disk Boot Priority" then press Enter to bring up the priority menu.

Previous motherboard (Epia M830) Advanced BIOS Features Screen:
Make your thumb drive the first item (if it isn’t already) by arrowing down to highlight it and press COOLANT to move it up. Once the boot sequence is set correctly, press F10 then Enter to save the change and boot from the USB drive.

Earliest motherboard (Epia ML) BIOS Main Screen:
Use down-arrow to highlight "Advanced BIOS Features".

Earliest motherboard (Epia ML)d BIOS Main Screen:
Press Enter to access "Advanced BIOS Features".

Earliest motherboard (Epia ML) Advanced BIOS Features Screen:
Use down-arrow to highlight whatever is opposite "First Boot Device".

Press the PgUp (probably labeled “COOLANT” on your keyboard) until the first device is "USB-HDD". (Note: To reset the boot-sequence after reformatting your hard drive, select HDD-0 instead.)
Once the boot sequence is set correctly, press F10 then Enter to save the change and boot from the USB drive

If you have set this boot-sequence in order to reformat harddrive, click here for that procedure.