Installation (G4 CNC):
For G3 CNC installation,
click here.
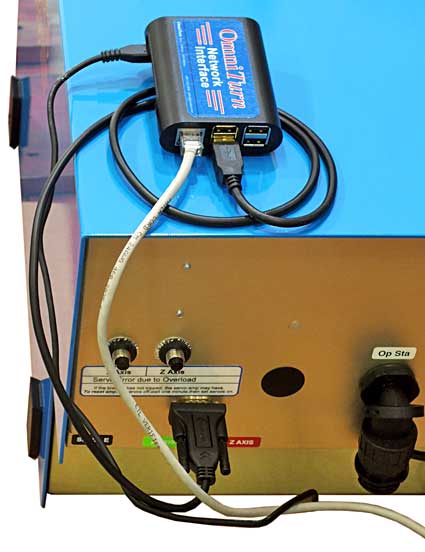
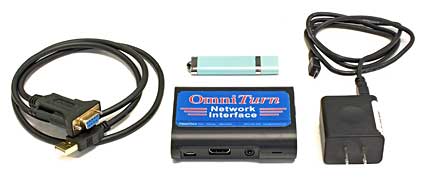
- For an ethernet installation, plug the ethernet cable into the Raspberry Pi’s RJ45 port.
- Plug the USB-RS232 adapter cable into the Raspberry Pi and the RS232 port on the control.
- Plug the Raspberry Pi’s power supply into the micro USB connector on the Raspberry Pi and an AC power outlet.
- Boot the Omniturn with the thumb drive for the network interface installed.
- At the file backup prompt, press Ctrl-C instead of Y or N, and you should be asked if you want to halt the batch file.
- Say Y to this prompt, and you will see the DOS prompt K:\CNC>
- At the DOS prompt:
- Type d: then Enter. The prompt should now be: D:\>
- Type g4inst then Enter. The installer batch file will create the directories and install the files needed.
- Reboot the Omniturn when the installation is completed.
Using the Interface:
Operation from the CNC side:
The interface needs a minute or so to boot. This isn’t an issue if the interface is left powered up all the time, but if you only power up the interface when you need it you’ll have to wait for it.
Pressing F7 in Auto mode will bring up the interface screen. After the file transfer is complete, exiting the interface program will bring you back to the Auto screen.
When the interface program starts up it displays a menu with 3 options:
Would you like to:
- Receive a program from another computer
- Send a program to another computer
- Exit file transfer program
When you select number 1 you will be shown a listing of files on the network interface device and prompted for the name of the one you want to transfer.
Typing the name and pressing Enter will transfer the file. You will be given the choice to overwrite if the file already exists on the Omniturn. The file will be displayed as it’s transferred. Pressing Esc without choosing a file will return you to the menu.
Typing the name and pressing Enter will transfer the file. You will be given the choice to overwrite if the file already exists on the Omniturn. The file will be displayed as it’s transferred. Pressing Esc without choosing a file will return you to the menu.
When you select number 2 you will be prompted for the name of the file you want to send. When you enter it, it will be sent. If you press Esc before entering the file name you will be returned to the menu.
Operation from the network computer side:
You can designate the network interface as a network drive or as a shared folder, or you can just copy files from the command prompt if that’s what you prefer.
We prefer to set up a shortcut to each interface (for example, the target would be \\omniturn2\share for the interface of that hostname). You can then just handle files on the interface as if they are local to your computer.
General considerations:
One of the main advantages of network connection is that it allows you to make sure that only the current version of any file is available to the machines.
For this reason, the number of files that are available on each machine’s network interface should be kept to a minimum, so that they can easily be kept up to date. Files that aren’t going to be needed in the near future shouldn’t be on the interface.
You can push files to the machine’s interface from your desktop, but the Omniturns can’t pull them from your desktop. Each machine only has access to files that are in the /share folder on its own interface.
The file transfer folder on the network interface is called /share and it’s set up to be public. Your IT department can adjust the permissions as desired, using the kermit terminal interface from the Omniturn side or PuTTY or some other SSH terminal program from the network side.
It’s a Linux computer, running the Debian "Stretch" package. We don’t recommend updating the OS, since Linux developers like to tinker with things like where files are located and what utilities are included, potentially breaking our setup.
Installation (G3 CNC):
- For an ethernet installation, plug the ethernet cable into the Raspberry Pi’s RJ45 port.
- Plug the USB-RS232 adapter cable into the Raspberry Pi and the RS232 port on the control.
- Plug the Raspberry Pi’s power supply into the micro USB connector on the Raspberry Pi and an AC power outlet.
- Boot the Omniturn with the thumb drive for the network interface installed.
- At the file backup prompt, press Ctrl-C instead of Y or N, and you should be asked if you want to halt the batch file.
- Say Y to this prompt, and you will see the DOS prompt C:\OMNITURN>
- At the DOS prompt:
- Type a: then Enter. The prompt should now be: A:\>
- Type g3inst then Enter. The installer batch file will create the directories and install the files needed.
- Reboot the Omniturn when the installation is completed.

