Overview
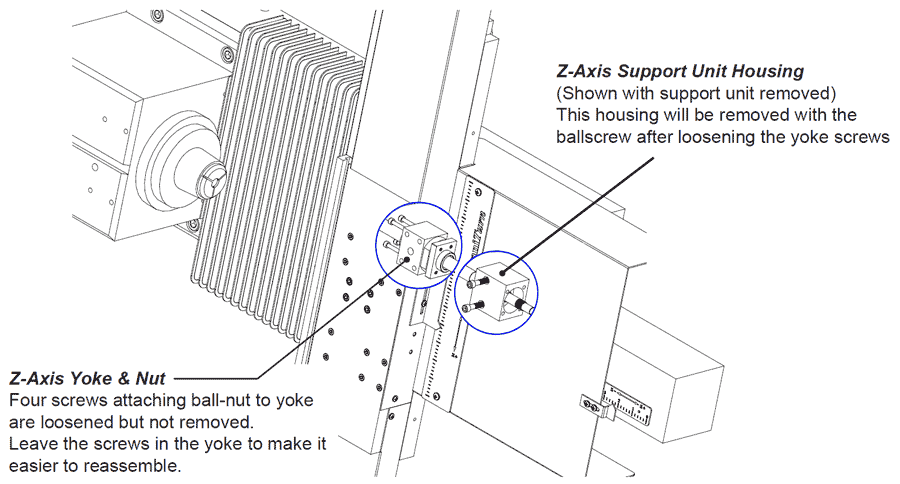
This document describes how to remove & replace the z-axis ballscrew without removing the x-axis components. The ‘trick’ is to loosen the screws that hold the ball-nut to the yoke, but leave them in place for easy reassembly, and to release the support unit housing so it comes out with the ballscrew. The procedure was developed by the late John LaZear.
IMPORTANT NOTE: Ballscrews are shipped full length and must be cut to length using an abrasive saw.
- Remove sheetmetal
- Remove servo motor
- Remove support unit (thrust bearing)
- Loosen (4) screws holding ball-nut
- Remove support unit housing
- Remove & replace ballscrew
- Attach new suport unit to ballscrew
- Install new support unit
- Replace servo motor
- Replace all sheetmetal
- Verify home pointer
- Re-set all tools before running!
Order of Operations:
Special Z-Axis Ballscrew Replacement Details
Remove Z-Axis Sheet Metal: (Current)
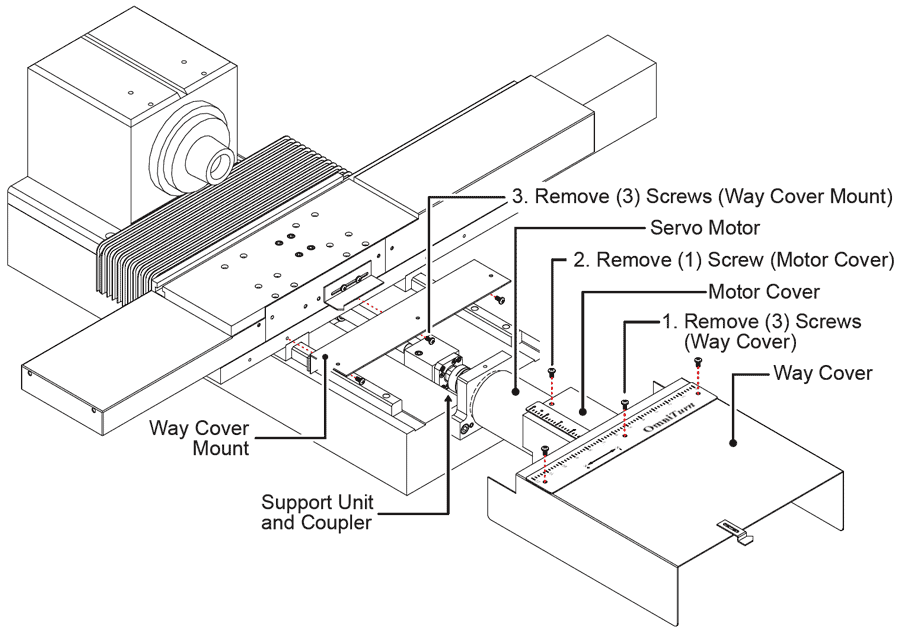
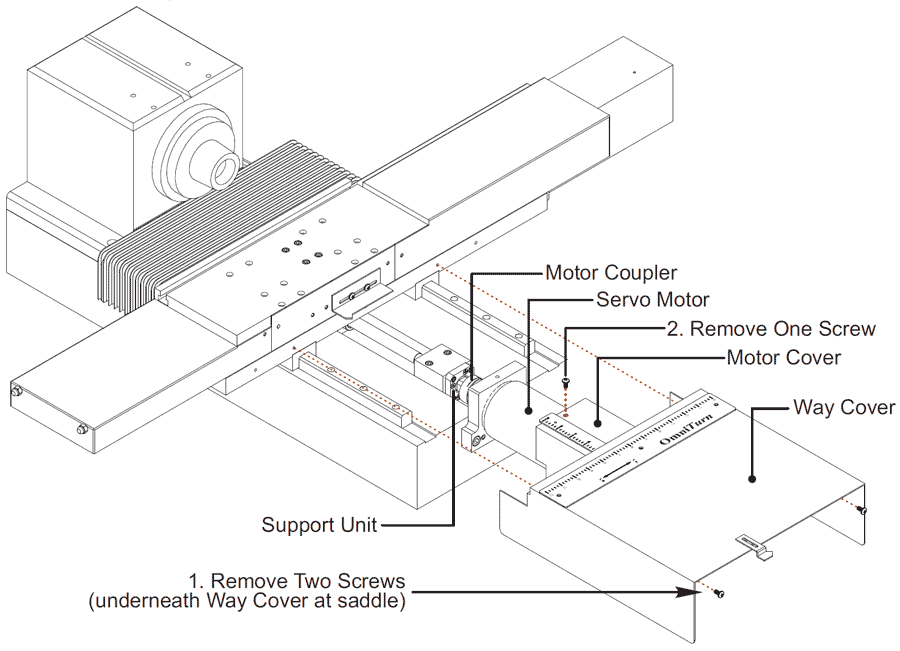
To remove Z-Axis Sheet Metal: (Old-style)
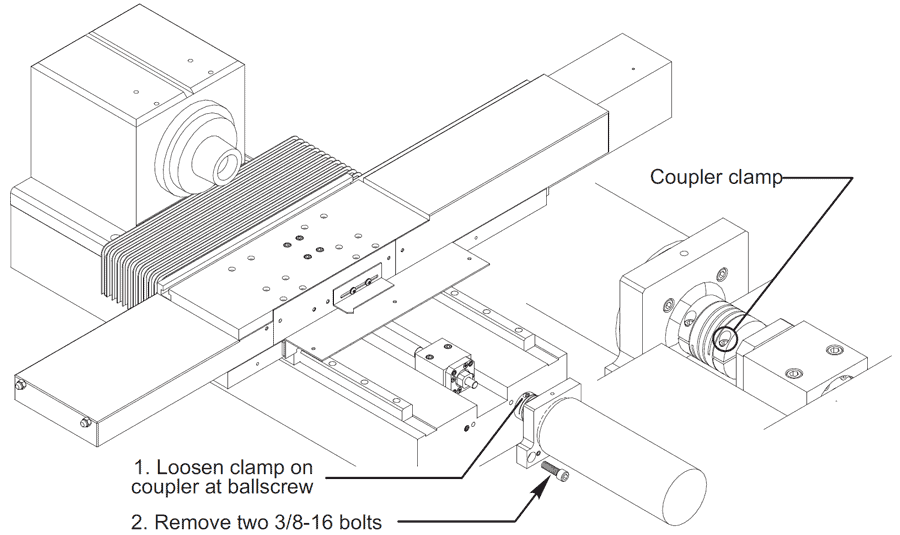
Remove Servo Motor
- Loosen coupler clamp at ballscrew end.
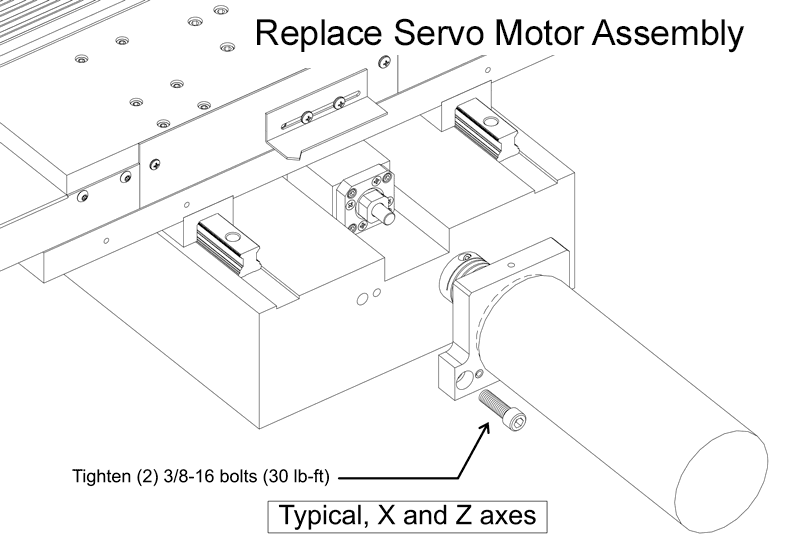
- Remove two 3/8-16 SHCS that hold motor mount to base.
- Roll-pins align motor to ballscrew; jiggle as required to remove assembly.
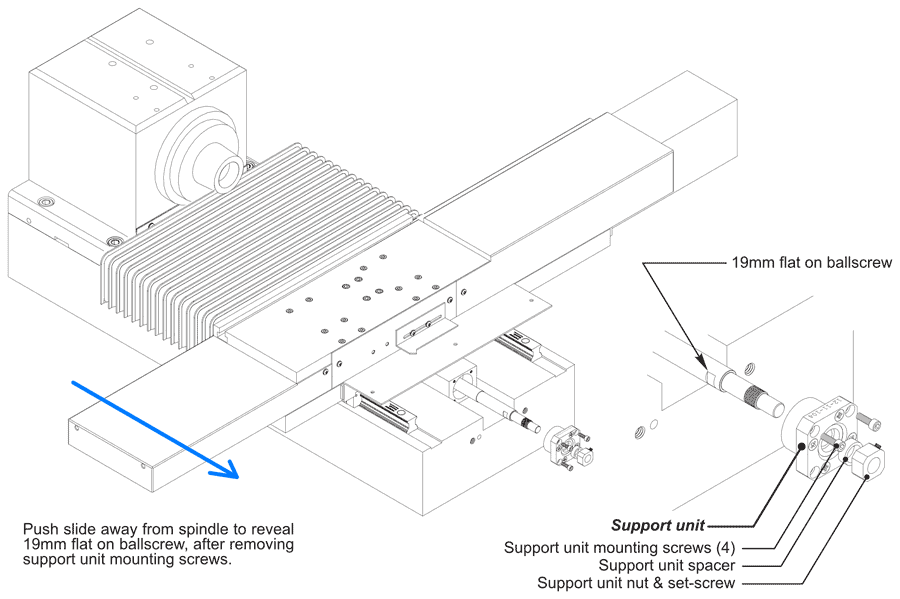
Remove Support Unit (Thrust Bearing)
- Remove four socket screws holding support unit to block.
- Push slide in z-axis to expose flat on ballscrew.
- Loosen support unit nut set-screw.
- Loosen support unit nut using1/2”and 19mm wrenches.
After removing support unit mounting screws, push slide up to reveal 19mm flat on ballscrew.
Loosen set-screw in support unit nut, then move support unit nut using 19mm and 1/2" wrenches.
Note: there is a tiny brass cushion under the set screw. The new support unit has a replacement.
Loosen Ball-nut Screws
- Loosen four 10-24 SHCS that attach ball-nut to yoke.
Leave screws in yoke to facilitate re-assembly. If they fall out, it’s hard to get them back into the holes in the yoke. - Remove accordion way cover (lift straight up from slide), then position slide so you can reach the screws with 5/32 hex wrench.
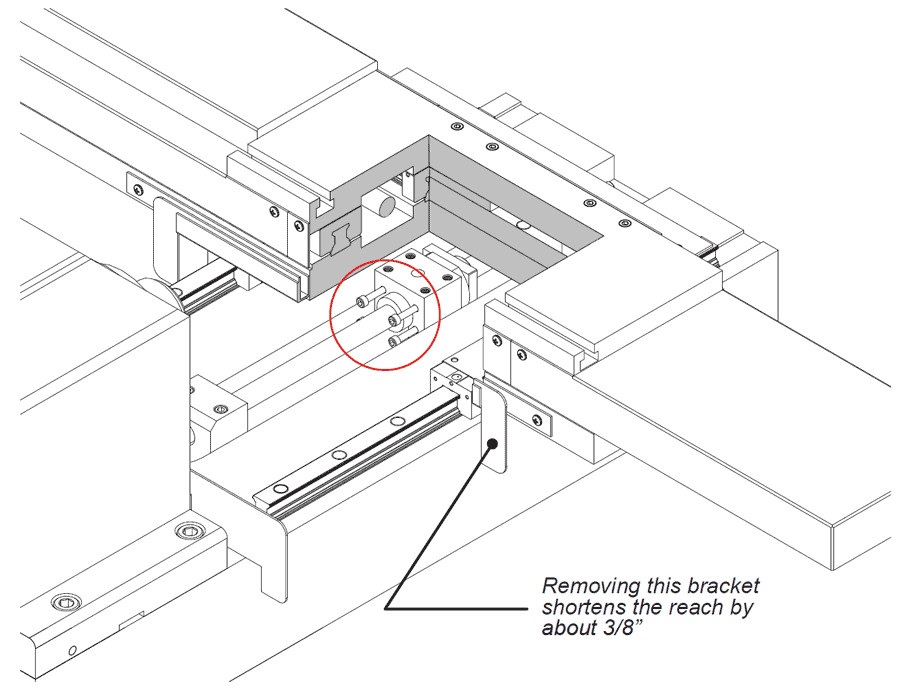
Remove support unit housing
- Gently push tooling plate all the way to headstock to allow maximum play in ballscrew while removing support unit housing.
The housing is pinned in place, so it may need to be lightly tapped from the side.
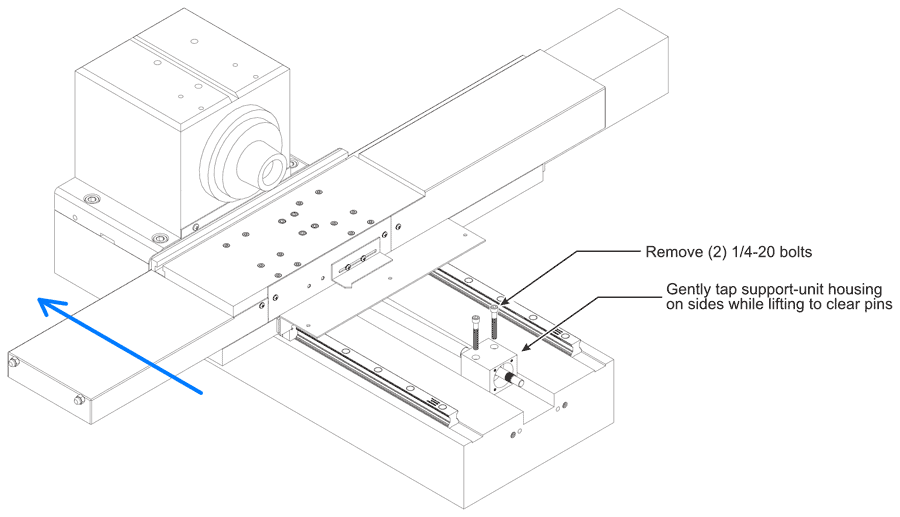
Remove the Ballscrew
- Lift the support unit housing, then gently slide ballscrew assembly out.
- Note the location of the ballscrew nut on the screw; you will position the nut at about the same place when you replace the ballscrew.
- The new ball screw must be cut to length:
- Measure your old ballscrew and compare it to the new one.
- Use an abrasive cut-off wheel, and cut ball screw to match the length of the old one.
- To prevent contamination while cutting, poke the end out of the bag and tie off the bag. Wash cut end with solvent before removing ballscrew from bag.
- Install the support unit housing:
- Locate the ballscrew nut at approximately the same place on the new ballscrew as it was on the old one.
- Slide the Actuator (bumper) onto the ballscrew.
- Guide the end of the ballscrew through the yoke.
- Reinstall the support unit housing, (torque two 1/4-20 SHCS to 80 in/lb).
- Gently pull the tooling plate away from the spindle, guiding the ballscrew nut into the yoke.
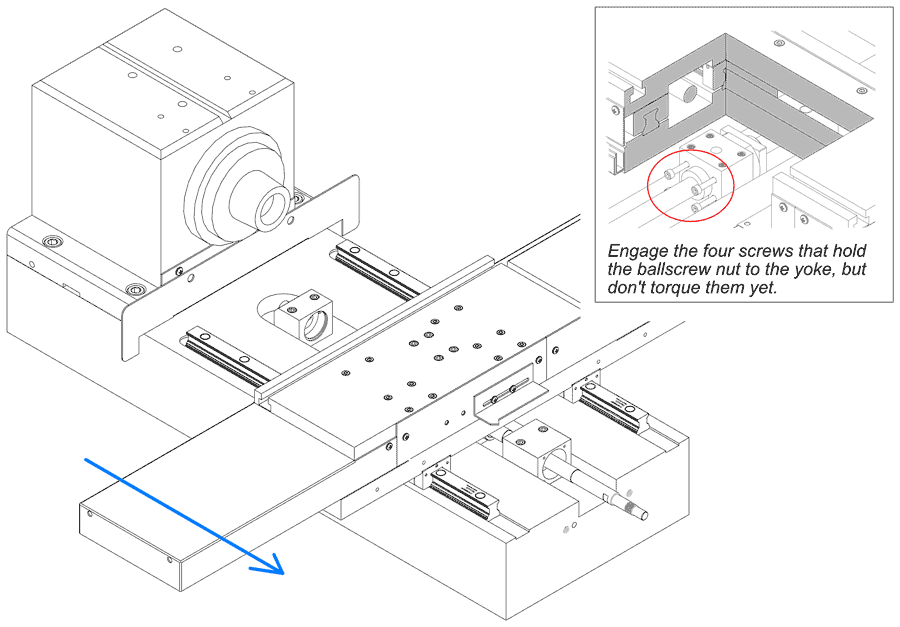
- Engage the four ball-nut mounting screws but do not tighten yet.
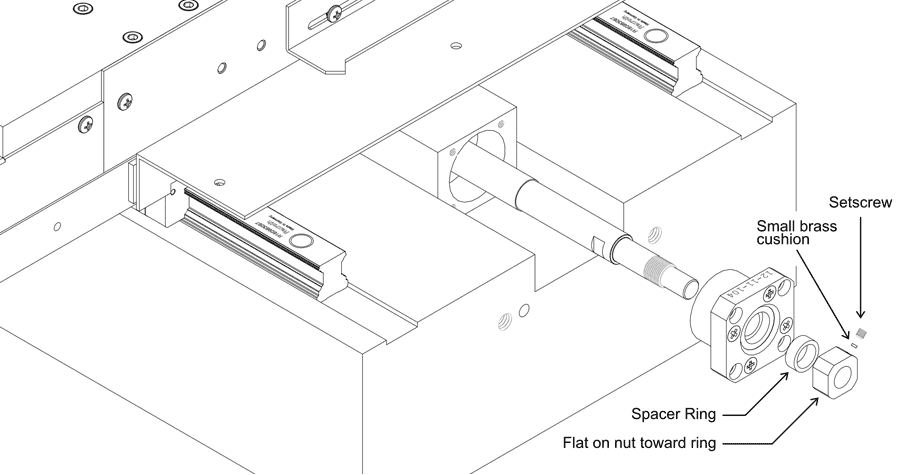
- Slide support unit onto ballscrew.
- Slide spacer ring onto ballscrew.
- Tighten nut using ½”and 19mm wrenches NOTE: Ground flat on nut goes against ring.
- Install small brass cushion.
- Secure nut with setscrew (not too tight).
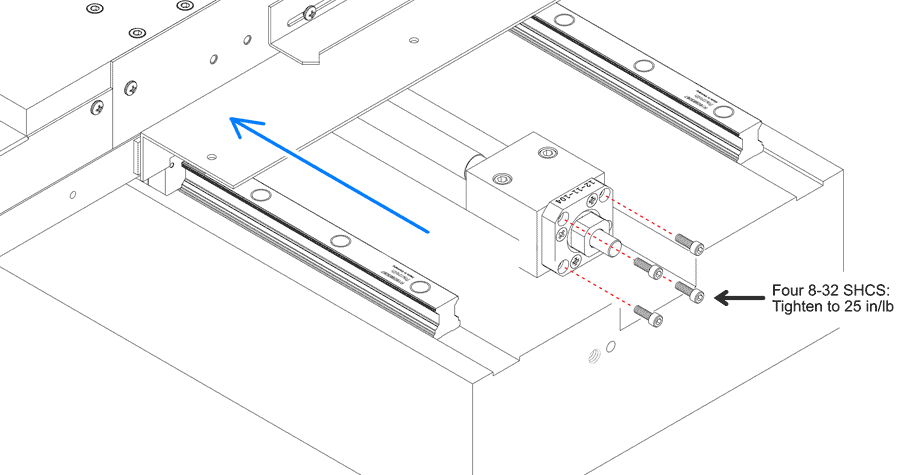
- Gently push slide toward spindle to seat support unit in block.
- Tighten four 8-32 SHCS to 25 in/lbs.
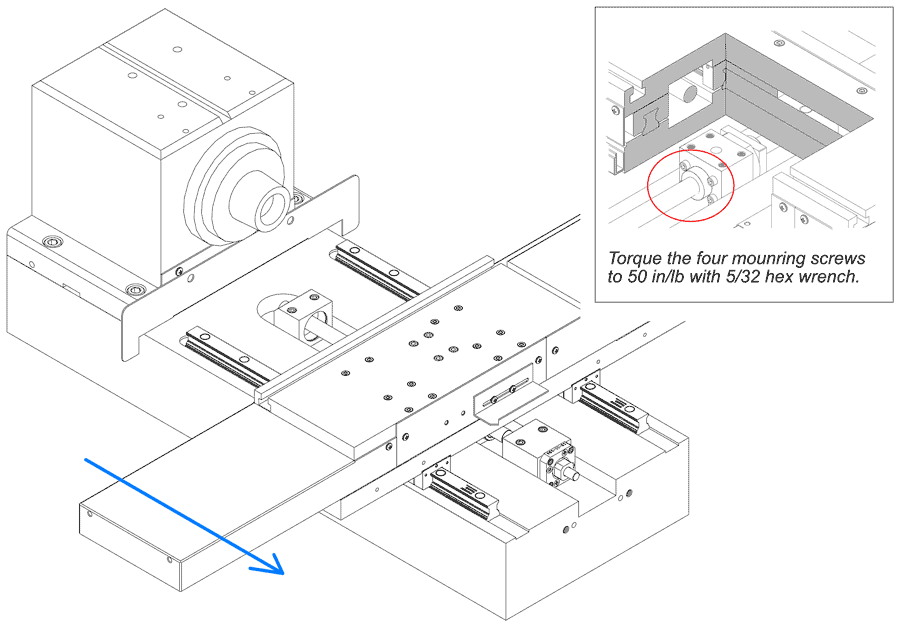
- After installing the support unit, pull slide up against support unit housing, then tighten the four 10-24 SHCS mounting screws to 50 in/lbs with a 5/32 hex wrench.
- Reinstall accordian way cover (and bracket on spindle-side of saddle, if removed for extra clearance).
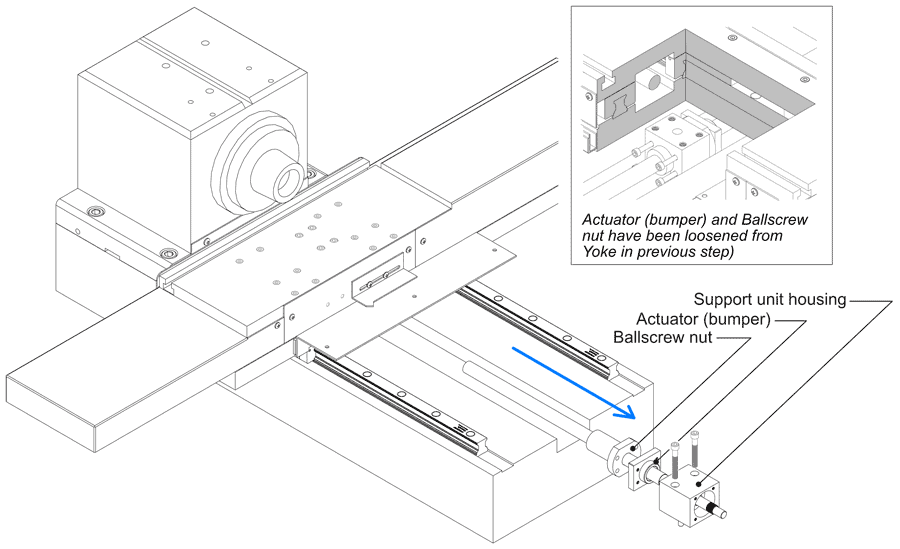
Reinstall the Support Unit Housing
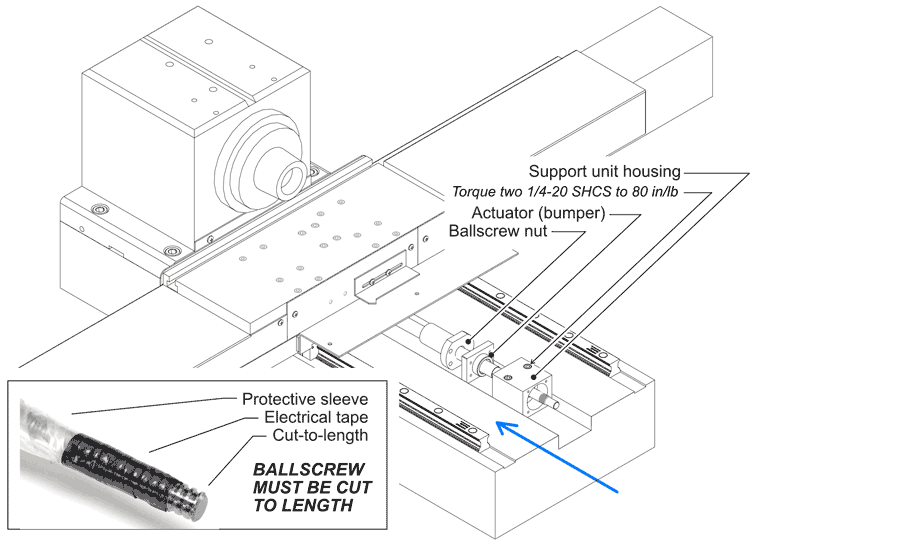
Install the Ballscrew
Mount Support Unit (Thrust Bearing) to Ballscrew
Install Support Unit (Thrust Bearing)
To Replace Servo Motor and Coupler
- Pull the slide all the way away from the spindle, against the Belleville stack.
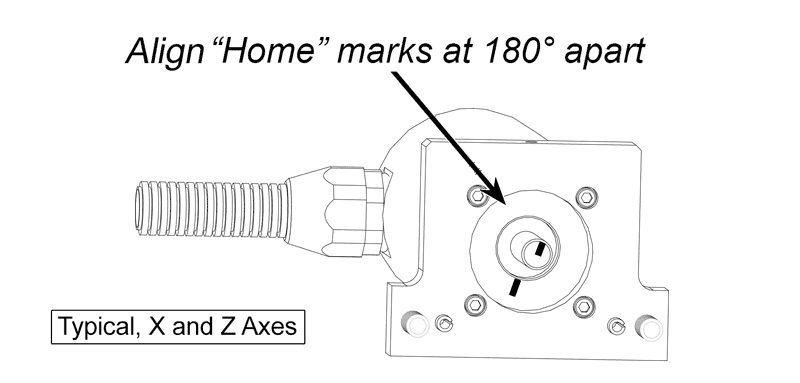
- Notice the mark on the end of the motor shaft and another on the face of the motor. These marks are aligned when the motor is at “home”. Turn the motor shaft so that the marks are 180° apart; that is 1/2 turn. This provides about 0.100” clearance past home.
- Attach motor assembly to the base, slipping the shaft into the coupler. Don’t let the motor shaft turn much off its 180° setting. Iighten (2) 3/8-16 SHCS to 30 lb-ft.
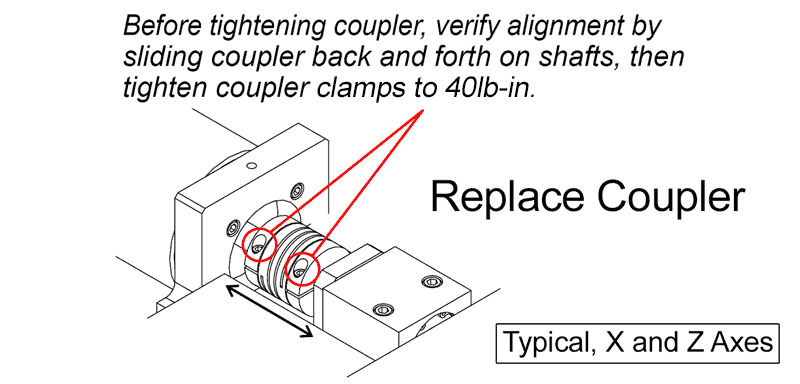
- Check alignment by sliding coupler back and forth on motor and ballscrew shafts; tighten the coupler clamps to 40lb-in.
- Install all sheet metal.
- After re-assembly, jog the axis toward home, and verify that the scale pointer will go just slightly past “0”; jog back inside of “0”, then establish Home as usual.
If the pointer is not at ”0”, loosen it and move it as required. - Re-set all tools before running!
Scroll down for step-by step instructions with illustrations.
- Align Home Marks at 180°
- Reinstall Motor Assembly
- Verify Coupler Alignment and Tighten Clamps
- Install all sheet metal.
- After re-assembly, jog the axis toward home, and verify that the scale pointer will go just slightly past “0”; jog back inside of “0”, then establish Home as usual.
If the pointer is not at ”0”, loosen it and move it as required. - Re-set all tools before running!